Distributed Block Storage with Longhorn
Today we are going to run through how to get the most from your ComputeBlade cluster when it comes to storage, and learn how to effectively aggregate NVMe drives using Kubernetes and Longhorn.

Introduction
Your ComputeBlade nodes support up to PCIe 3.0 NVMe drives with the latest Raspberry Pi CM5. You want to expand your storage capabilities, but each node provides disparate block storage that isn't accessible across different nodes in the cluster. If you start a pod on one node, it cannot access storage defined on another. So how do we make one seamless storage volume composed from all of the drives from each ComputeBlade?
This is where Longhorn comes in to help.
What is Longhorn?
Longhorn is an open-source, lightweight, scalable, and highly available distributed storage solution specifically designed for Kubernetes. It simplifies the management of persistent storage in clusters by providing block storage that can be attached to containers, enabling stateful workloads. It provides:
- Simple Resource Binding
- Snapshots and Backups
- Automatic Healing
- Cross-Cluster Disaster Recovery
- A User-Friendly Interface
Cluster Pre-Requisites
In one of our previous articles, we described how to physically set up your ComputeBlade cluster. That is step one to using your ComputeBlade, so if you haven't already, you can follow along there to get started and come back to this article later!

We've also posted an article about how to configure and run a MicroK8s cluster with the CM4/5. This article requires the knowledge from that post too, so make sure you have your MicroK8s setup working!
In our Portainer setup article, we also described how to use Persistent Volumes with a local storage provider. We will repeat some setup instructions from this, specific to our multi-node storage configuration.
Longhorn requires at least 3 nodes with extra disk space to replicate data. Verify your ComputeBlade nodes have sufficient resources!
Getting Started
To begin, we're going to describe the ComputeBlade test setup:
- 4 physical nodes with a Raspberry Pi CM4 8gb (you can use any compute module though!)
- 256gb NVMe drives installed on each blade
- MicroK8s installed on each node, and already joined to a cluster. Make sure to read How to Setup Multi-Node from our Portainer setup article article if you haven't done this!
Let's start off by verifying our setup. In a terminal, type:
kubectl get nodes -o wide
You should see output similar to the following:
NAME      STATUS   ROLES    AGE   VERSION   INTERNAL-IP     EXTERNAL-IP   OS-IMAGE             KERNEL-VERSION     CONTAINER-RUNTIME
blade01   Ready    <none>   13m   v1.31.3   192.168.4.200   <none>        Ubuntu 24.04.1 LTS   6.8.0-1017-raspi   containerd://1.6.28
blade02   Ready    <none>   98s   v1.31.3   192.168.4.201   <none>        Ubuntu 24.04.1 LTS   6.8.0-1017-raspi   containerd://1.6.28
blade03   Ready    <none>   62s   v1.31.3   192.168.4.202   <none>        Ubuntu 24.04.1 LTS   6.8.0-1017-raspi   containerd://1.6.28
blade04   Ready    <none>   4s    v1.31.3   192.168.4.203   <none>        Ubuntu 24.04.1 LTS   6.8.0-1017-raspi   containerd://1.6.28
Install Longhorn
Once you see the number of blades in your cluster, we can begin installing Longhorn. You should already have helm installed from prior steps, so we will use it now by adding the Longhorn repository:
helm repo add longhorn <https://charts.longhorn.io>
helm repo update
It makes sense to add a namespace for all of the Longhorn management pods. You can do this combined with the installation command:
helm install longhorn longhorn/longhorn \\
	--namespace longhorn-system --create-namespace \\
	--set csi.kubeletRootDir="/var/snap/microk8s/common/var/lib/kubelet"
kubectl get pods --namespace longhorn-system
NAME                                                READY   STATUS              RESTARTS      AGE
csi-attacher-7b9c8f66f5-4p6jt                       0/1     ContainerCreating   0             14s
csi-attacher-7b9c8f66f5-kvtpt                       0/1     ContainerCreating   0             14s
csi-attacher-7b9c8f66f5-l57w8                       0/1     ContainerCreating   0             14s
csi-provisioner-848d57b57f-gpmd6                    0/1     ContainerCreating   0             14s
csi-provisioner-848d57b57f-txqr2                    1/1     Running             0             14s
csi-provisioner-848d57b57f-z2tgz                    0/1     ContainerCreating   0             14s
csi-resizer-86686bd8b7-2p655                        0/1     ContainerCreating   0             14s
csi-resizer-86686bd8b7-b5zmn                        0/1     ContainerCreating   0             14s
csi-resizer-86686bd8b7-hss9g                        0/1     ContainerCreating   0             14s
csi-snapshotter-668fcdd548-bd92l                    0/1     ContainerCreating   0             13s
csi-snapshotter-668fcdd548-m7w47                    0/1     ContainerCreating   0             13s
csi-snapshotter-668fcdd548-vmzqg                    0/1     ContainerCreating   0             13s
engine-image-ei-51cc7b9c-b4qb6                      1/1     Running             0             63s
engine-image-ei-51cc7b9c-mndgb                      1/1     Running             0             63s
engine-image-ei-51cc7b9c-v8xdm                      1/1     Running             0             63s
engine-image-ei-51cc7b9c-xpfpq                      1/1     Running             0             63s
instance-manager-451ac04878fe4da3c57e57463ef67459   0/1     ContainerCreating   0             26s
instance-manager-5eea80b598ec00f0553f63a86bbfd9c8   0/1     ContainerCreating   0             25s
instance-manager-a280bfe08f6fdbd0971f0c7e1f13b967   0/1     ContainerCreating   0             33s
instance-manager-c8dd3ea59e8945dec6f6e8b157a2e4d4   0/1     ContainerCreating   0             25s
longhorn-csi-plugin-2qqvv                           0/3     ContainerCreating   0             13s
longhorn-csi-plugin-kqkfs                           0/3     ContainerCreating   0             12s
longhorn-csi-plugin-v4xtk                           0/3     ContainerCreating   0             12s
longhorn-csi-plugin-zq7c8                           0/3     ContainerCreating   0             13s
longhorn-driver-deployer-8f58f8cbd-n6mrs            1/1     Running             1 (55s ago)   112s
longhorn-manager-bjr9d                              2/2     Running             1 (63s ago)   112s
longhorn-manager-hkpst                              2/2     Running             1 (63s ago)   112s
longhorn-manager-nk8jp                              2/2     Running             1 (63s ago)   112s
longhorn-manager-wdr4w                              2/2     Running             0             111s
longhorn-ui-7557bc8dd-5xcsw                         1/1     Running             0             112s
longhorn-ui-7557bc8dd-sxrdg                         1/1     Running             0             111s
You will begin to see that Longhorn is starting several pods — the UI, the manager, and file system driver and the Longhorn engine along with CSI drivers. Wait (~3 mins) until these are all in Running status, and then you can begin steps to connect to the Longhorn UI. You can check on the deployment status with the following command:
kubectl get deployments --all-namespaces
NAMESPACE         NAME                       READY   UP-TO-DATE   AVAILABLE   AGE
kube-system       calico-kube-controllers    1/1     1            1           7m27s
kube-system       coredns                    1/1     1            1           7m28s
longhorn-system   csi-attacher               3/3     3            3           89s
longhorn-system   csi-provisioner            3/3     3            3           89s
longhorn-system   csi-resizer                3/3     3            3           89s
longhorn-system   csi-snapshotter            3/3     3            3           89s
longhorn-system   longhorn-driver-deployer   1/1     1            1           3m7s
longhorn-system   longhorn-ui                2/2     2            2           3m7s
Activate the Ingress Addon
We need to be able to route HTTP requests into the cluster's pods. To do this, MicroK8s provides a simple ingress for us to install:
microk8s enable ingress
Once that's done, we can create an ingress for Longhorn:
cat <<EOF | kubectl apply -f -
apiVersion: networking.k8s.io/v1
kind: Ingress
metadata:
  name: longhorn
  namespace: longhorn-system
spec:
  rules:
  - host: longhorn-ui.uptime.example
    http:
      paths:
        - path: /
          pathType: Prefix
          backend:
            service:
              name: longhorn-frontend
              port:
                number: 80
EOF
Create a DNS Rewrite Rule
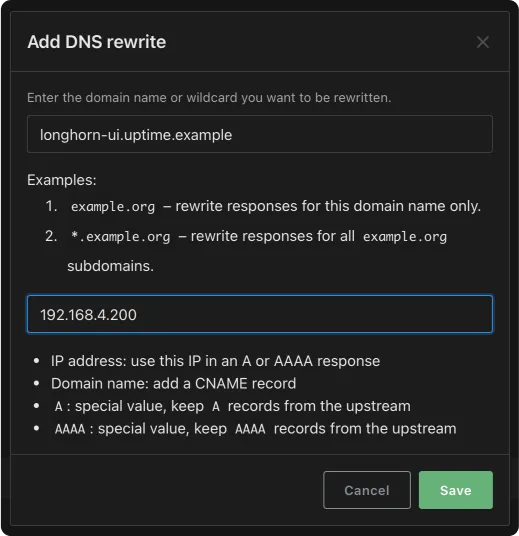
If you have access to creating DNS records on your network, you can add: longhorn-ui.uptime.example to your rewrite list with the URL of the load balancer IP:
kubectl get ingress --namespace longhorn-system
NAME       CLASS    HOSTS                        ADDRESS     PORTS   AGE
longhorn   public   longhorn-ui.uptime.example   127.0.0.1   80      2m22s
For AdGuard home, this looks like the following:

Once this is done, you can browse to http://longhorn-ui.uptime.example to see the dashboard!
Browsing the UI
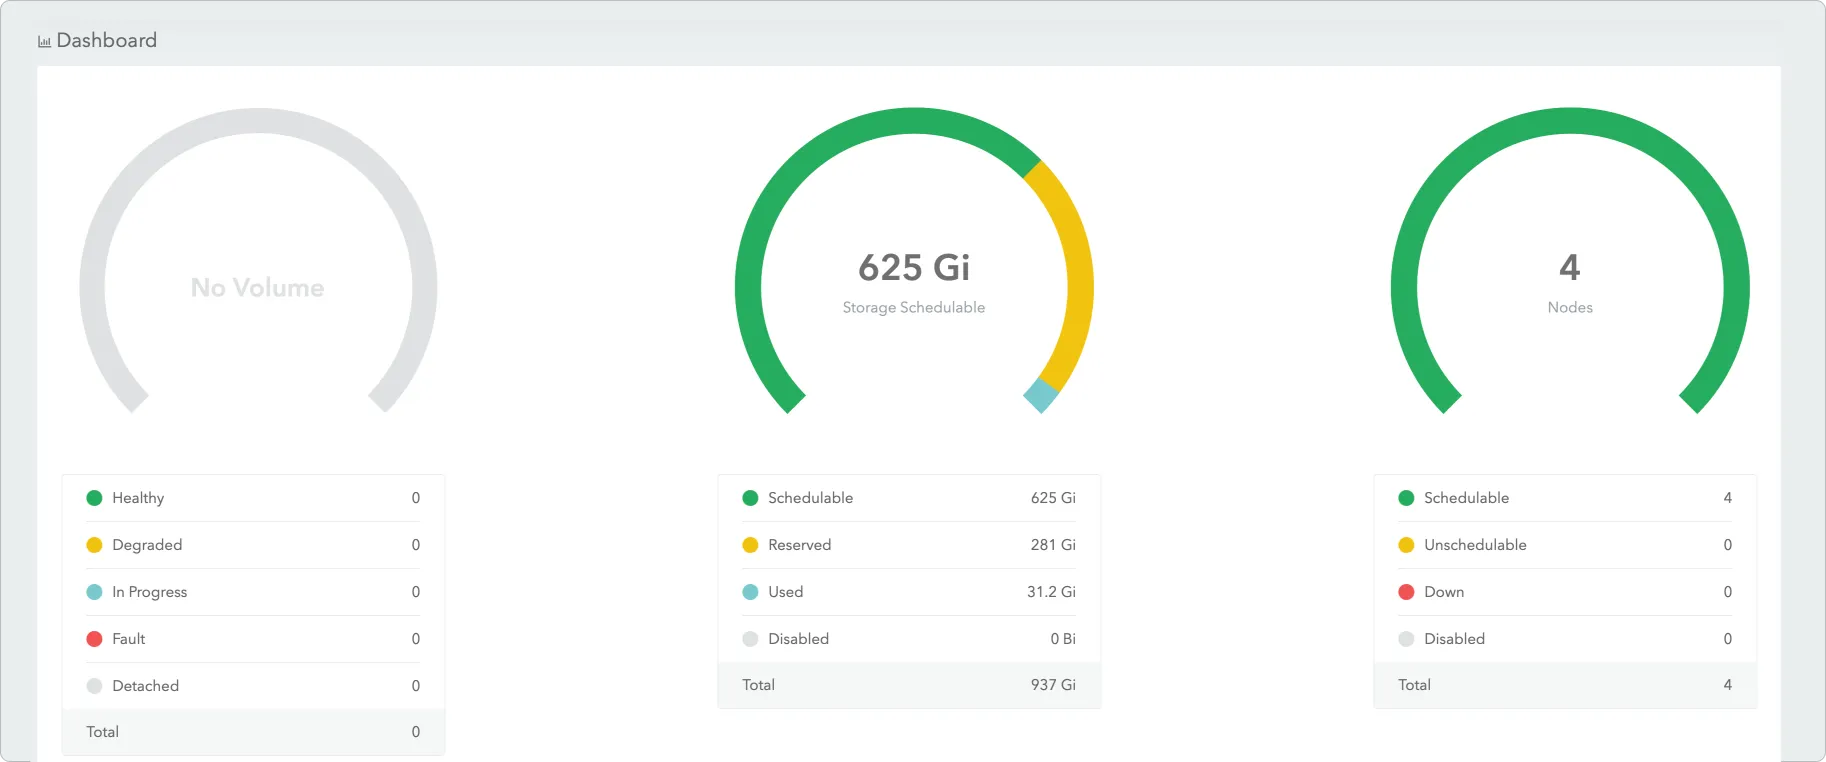
Now that an ingress is configured, you'll have access to the dashboard:

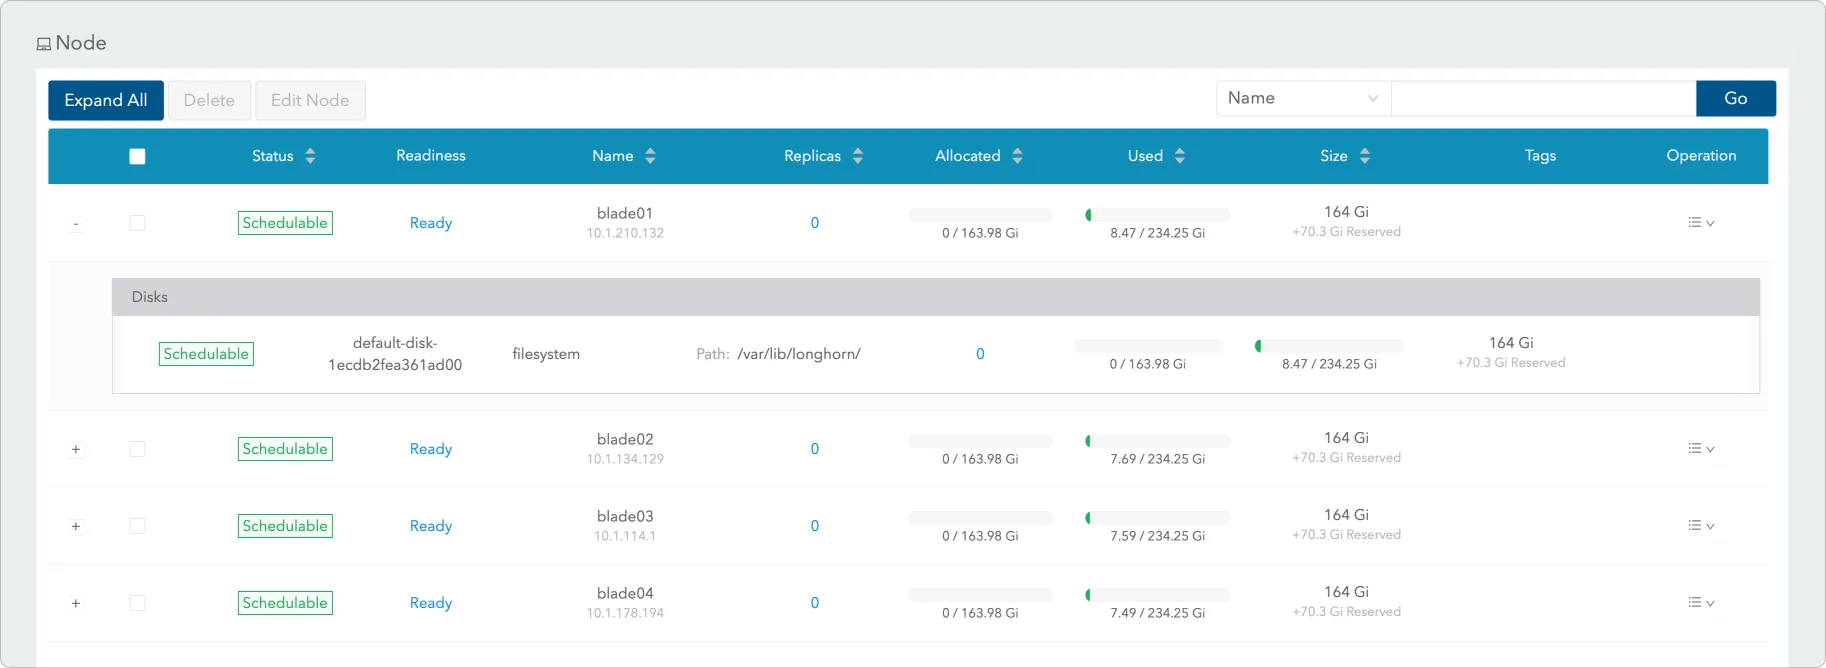
Explaining the Node UI
Longhorn breaks down your storage configurations on it's dashboard. You can also browse the disk configuration for individual nodes:

Congratulations! If you made it this far, you've successfully configured Longhorn on your cluster! 🎉
Creating a Deployment with a Persistent Volume Claim
Now that we have some storage that spans across all of the nodes, you can define workloads that allocate volumes in Longhorn-backed storage class, and the engine will take care of handling all of the filesystem I/O.
To try it out, lets create a new deployment. Create a file with the contents:
apiVersion: v1
kind: PersistentVolumeClaim
metadata:
  name: longhorn-nginx
spec:
  accessModes:
    - ReadWriteOnce
  resources:
    requests:
      storage: 2Gi
  storageClassName: longhorn
---

apiVersion: apps/v1
kind: Deployment
metadata:
  name: nginx
spec:
  replicas: 1
  selector:
    matchLabels:
      app: nginx
  template:
    metadata:
      labels:
        app: nginx
    spec:
      containers:
      - name: nginx
        image: nginx:latest
        ports:
        - containerPort: 80
        volumeMounts:
        - name: nginx-storage
          mountPath: /usr/share/nginx/html
      volumes:
      - name: nginx-storage
        persistentVolumeClaim:
          claimName: longhorn-nginx
And apply the configuration:
kubectl apply -f nginx.yaml
persistentvolumeclaim/longhorn-nginx created
deployment.apps/nginx created
This creates a new sample webserver and uses the new Longhorn storage. You can verify that the everything was created by issuing the commands:
kubectl get pv
NAME                                       CAPACITY   ACCESS MODES   RECLAIM POLICY   STATUS   CLAIM                    STORAGECLASS   VOLUMEATTRIBUTESCLASS   REASON   AGE
pvc-8982270f-9c4e-4e1b-9373-acdfa65342f9   2Gi        RWO            Delete           Bound    default/longhorn-nginx   longhorn       <unset>                          51s
>uptime@blade01:~$ kubectl get pvc
NAME             STATUS   VOLUME                                     CAPACITY   ACCESS MODES   STORAGECLASS   VOLUMEATTRIBUTESCLASS   AGE
longhorn-nginx   Bound    pvc-8982270f-9c4e-4e1b-9373-acdfa65342f9   2Gi        RWO            longhorn       <unset>                 56s
This means that the deployment for our example nginx server got a volume that is 2Gi in size. Confirming this in the Longhorn UI:

Wrapping Everything Up
You've successfully set up Longhorn on your Kubernetes cluster, leveraging the power of ComputeBlade to create a scalable and efficient storage solution. Longhorn's block storage capabilities, paired with ComputeBlade's high-performance infrastructure, ensure your workloads can grow seamlessly as you expand your cluster.
Whether running snapshots, backups, or replication, ComputeBlade and Longhorn work together to deliver reliable, bottleneck-free performance. Looking ahead, you can explore Longhorn's backup and restore options, integrate offsite storage for disaster recovery, or monitor your setup with tools like Prometheus and Grafana.
With Longhorn and ComputeBlade, you're ready to tackle demanding workloads with storage that scales effortlessly.
Thanks for following along — good luck with your deployments, and happy scaling! 🚀

